How to Size a Solar System for a Camper Van: 5 Best Kits
Knowing how to size a solar system for a camper van is the difference between a rig that runs your fridge and laptop all day and one that leaves you hunting for shore power by 3 PM. I’ve built and rebuilt van systems more times than I care to admit — from a bare 100W panel bolted to a Sprinter roof in 2019 to a 600W lithium setup I’m running now. Most people overbuy panels and underbuy battery. Some do the opposite. This guide cuts through the noise with five field-tested products that actually earn their keep, plus a straight-talk framework for calculating what your specific rig actually needs.
What to Look for When Sizing a Solar System for a Camper Van
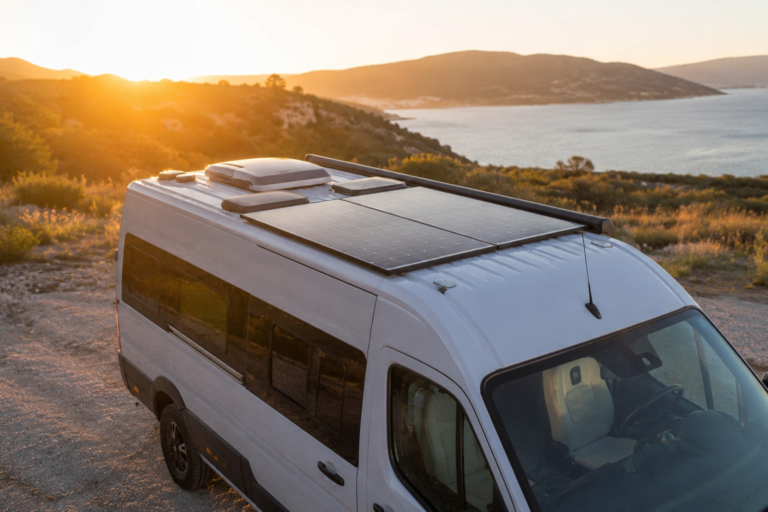
[IMAGE: camper van rooftop solar panels]
Start with your load, not your panel count. Add up every device you run daily — fridge, fans, lighting, phone charging, laptop — and estimate the watt-hours consumed per 24 hours. A 12V compressor fridge like the BougeRV CR55 pulls roughly 45Wh per hour at moderate temps. A diesel heater’s control board sips maybe 10Wh. Most van builders land between 150Wh and 500Wh of daily consumption. That number drives every other decision.
Battery capacity is your buffer, not your budget line. A general rule: size your battery bank to hold 2–3 days of consumption without solar input, then let the panels replenish it. If you’re running 300Wh/day, you want at least 600Wh of usable capacity — which means 100Ah of lithium (LiFePO4) at 12V, since you can discharge LiFePO4 to near 100% depth of discharge safely. Lead-acid? Double that number because you’re limited to 50% DoD. The math matters. NREL’s solar resource data can show you how many peak sun hours to expect at your typical destinations.
Panel wattage should roughly match your daily consumption divided by your average peak sun hours. Four peak sun hours a day is a reasonable national average for the lower 48. If you need 300Wh, a 100W panel theoretically delivers 400Wh — but factor in 20–30% efficiency losses from heat, shade, and inverter conversion. Real-world output from a 100W panel on a van roof in summer? More like 60–70W average. Budget accordingly, and don’t cheap out on the charge controller — it’s the brain of the system. Explorist.life’s free solar calculator is the tool I send every first-timer to.
Top 5 Products for Sizing and Building a Camper Van Solar System
[IMAGE: van life solar components laid out]
1. Renogy 200W 12V Monocrystalline Solar Starter Kit
[IMAGE: Renogy 200W solar panel kit]
Renogy’s 200W starter kit has been the entry point for van builders for years, and there’s a reason it keeps showing up on build threads and Reddit’s r/vandwellers. The kit ships with two 100W mono panels, a 30A PWM charge controller, mounting hardware, and enough cable to get you started. Street price runs around $229–$259 depending on the retailer.
What the spec sheet doesn’t tell you: the included PWM controller (the Renogy Wanderer) is fine for a simple AGM setup but leaves efficiency on the table compared to MPPT. If you’re running LiFePO4 batteries, upgrade to their 30A MPPT Rover at purchase — it’s worth the extra $60 to recover that 10–15% efficiency difference, especially in winter when sun hours are short.
The panels themselves are legitimately solid. After 18 months on my roof through desert heat and Pacific Northwest rain, zero delamination, connectors still tight. The aluminum frame corners are reinforced better than cheaper clones I’ve tested.
Key Specs:
- 2x 100W monocrystalline panels (20.4V Vmp each)
- Includes 30A PWM Wanderer controller
- Compatible with 12V AGM, gel, lithium
- Panel dimensions: 47.0 x 21.3 x 1.4 inches each
Pros:
- Complete kit means no hunting for compatible components
- Panels hold up to real weather over time
- Wide dealer network — replacement parts aren’t a nightmare to source
Cons:
- Bundled PWM controller is a step down from MPPT — real efficiency loss with lithium batteries
- Mounting feet are aluminum but thin; replace with heavier-duty feet if you’re driving washboard roads regularly
- No Bluetooth monitoring included — you’re flying blind without a separate battery monitor
Field note: Parked for three cloudy days in Olympic National Park, I watched this system hold my fridge and lights going with a 100Ah LiFePO4 bank — but only because I’d swapped the controller to MPPT beforehand. With the stock PWM unit, I’d have been plugging in by day two.
Best for: First-time builders who want a proven starting point and plan to upgrade the controller.
2. Victron SmartSolar MPPT 100/30 Charge Controller
[IMAGE: Victron SmartSolar MPPT charge controller]
If you ask experienced van builders what single component they’d never downgrade, most say the charge controller. Victron’s SmartSolar 100/30 is the one I specify for any build running lithium. It handles up to 400W of panels (12V system) with a maximum input of 100V, and the Bluetooth integration via the VictronConnect app is genuinely useful — not a gimmick.
Pricing sits around $109–$129. That’s not cheap for a controller, but you’re paying for accuracy, longevity, and the ecosystem. Victron’s algorithm actively adapts to your battery chemistry, and you can fine-tune absorption and float voltages down to the tenth. That matters with LiFePO4 — most budget controllers push absorption too high and slowly cook your cells.
The Bluetooth monitoring is where this thing earns its keep on the road. At 2 AM when something feels off, I can roll over, open my phone, and see exactly what the controller is doing without crawling into my electrical compartment.
Key Specs:
- Max PV input: 100V
- Max charge current: 30A
- Max PV power (12V): 400W
- Bluetooth built-in, VictronConnect compatible
- Compatible: 12/24V systems, LiFePO4, AGM, gel, flooded
Pros:
- Real-time Bluetooth monitoring — charge state, PV watts, history
- LiFePO4 preset is accurate and battery-safe
- Built like it’ll outlast the van
Cons:
- No display on the unit itself — requires phone or separate Victron Color Control screen (sold separately)
- Victron’s app occasionally requires firmware updates that require a stable connection to complete — annoying mid-trip
- At $120+, it’s nearly the cost of the cheapest full kits — harder sell for budget builds
Field note: Driving through Arizona in July — ambient temps over 105°F — this controller derated slightly and logged it transparently in the app. A $30 unit from Amazon would have either fried or silently underperformed. Seeing that thermal derating data helped me redesign my ventilation.
Best for: Anyone running LiFePO4 who wants visibility into what their system is actually doing.
3. Battle Born LiFePO4 100Ah 12V Battery (GC3)
[IMAGE: Battle Born LiFePO4 lithium battery]
Battle Born has become the reference standard for van life lithium batteries, and after running two of these for over two years, I understand why. The 100Ah GC3 (their newer group size format) runs about $949 on their site — yes, that’s steep. But the math over time shifts: LiFePO4 chemistry gets 3,000–5,000 cycles vs. 300–500 for AGM. You’re buying a decade of capacity, not a few seasons.
What separates Battle Born from the budget lithium options isn’t the cells alone — it’s the internal BMS (Battery Management System). I’ve seen cheap lithium batteries from no-name brands trip their BMS in cold weather and refuse to charge below 32°F. Battle Born’s BMS handles charge cutoff gracefully and their cold weather heating option (available on newer units) extends usability below freezing.
Size and weight matter in vans. Each 100Ah Battle Born weighs 29 lbs versus roughly 63 lbs for a comparable AGM. In a 144″ Sprinter where every pound shifts handling, that difference compounds across a full battery bank.
Key Specs:
- 100Ah capacity at 12.8V nominal
- Usable capacity: ~100Ah (100% DoD rated)
- Cycle life: 3,000–5,000 cycles to 80% capacity
- Weight: 29 lbs
- Built-in BMS with low-temp protection
Pros:
- Industry-leading BMS reliability — I’ve never had a spurious trip in two years
- 10-year warranty and US-based support that actually answers
- Flat discharge curve means consistent voltage to your devices
Cons:
- $949 per 100Ah is a real barrier — you can buy three AGM batteries for that price upfront
- The GC3 form factor doesn’t fit standard battery boxes designed for group 27/31 — measure your compartment before ordering
- No Bluetooth monitoring built in — you need an external shunt or battery monitor to see state of charge accurately
Field note: After a three-day overcast stretch in the Oregon coast, I pulled 180Ah from this battery (running a fridge and fan non-stop) and the BMS never flinched. An AGM bank would have been at damaging depth-of-discharge territory; the Battle Born just handled it.
Best for: Full-time van lifers who plan to keep their rig for 5+ years and want to buy their battery bank once.
[INTERNAL LINK: best lithium batteries for van life]
4. Victron SmartShunt 500A Battery Monitor
[IMAGE: Victron SmartShunt battery monitor]
Here’s the component that most people skip and then regret. A battery monitor is how you actually know how to size a solar system for a camper van in practice — because without one, you’re guessing at state of charge based on voltage, which is wildly inaccurate with LiFePO4 chemistry. LiFePO4 voltage barely moves between 20% and 80% SoC. You need a coulomb counter.
The Victron SmartShunt 500A runs about $79–$89. It installs between your negative busbar and battery negative, measures every amp flowing in and out, and reports true state of charge to the VictronConnect app via Bluetooth. The app also tracks historical consumption — after a week, you’ll know exactly how much power your fridge uses overnight and whether your solar is genuinely keeping up.
The 500A version handles any practical van build. I’ve seen builders spec the 1000A version unnecessarily — unless you’re running serious inverter loads, 500A covers it.
Key Specs:
- Max continuous current: 500A
- Bluetooth via VictronConnect
- Tracks: SoC, voltage, current, power, consumed Ah, time remaining
- Accuracy: ±0.5% current, ±0.1% voltage
Pros:
- Pairs with Victron controller for unified app monitoring
- Installation is clean — just one shunt, no display panel required
- Accuracy over time is excellent once you let it sync to a full charge
Cons:
- Requires a full 100% charge sync to calibrate — if you’re always partial-charging, accuracy drifts over weeks
- The Bluetooth range is only about 10 meters — fine in a van, but annoying if you’re monitoring from outside camp
- App interface can feel cluttered to non-technical users; takes a few days to learn what you’re looking at
Field note: Three weeks into a trip through the Southwest, my SmartShunt showed my “400Ah bank” was only delivering 340Ah of usable capacity. Turns out one cell in a third-party battery was underperforming. Without this monitor, I never would have caught it until something failed.
Best for: Anyone who wants to actually understand their system’s performance, not just hope it’s working.
5. EcoFlow Delta 2 Max Portable Power Station (as a starter/backup system)
[IMAGE: EcoFlow Delta 2 Max power station]
This one is a bit of a curveball recommendation, but hear me out. The EcoFlow Delta 2 Max — around $999 street price — is not a permanent install. It’s a self-contained 2048Wh LiFePO4 power station with a built-in 1000W MPPT solar input, 2400W AC inverter, and a color touchscreen showing everything you’d want to know. For van lifers who are still figuring out how to size a solar system for a camper van, or who convert a van part-time, this eliminates the complexity of a hardwired build entirely.
I’ve used this as a primary system in a Transit Connect for weekend trips and as a backup system in my main rig. It accepts up to 1000W of solar input, which means you can run two 200W panels directly into it and be genuinely self-sufficient for moderate loads. The charging speed via solar is legitimately fast — 400W of input on a clear day fills it from 20% to 80% in about four hours.
The downside of all-in-one units is the downside of all-in-one units: when something fails, the whole system is compromised. That’s not a fake con. The inverter, BMS, and charge controller are not individually replaceable. In a hardwired build, you swap a $120 controller. In the Delta 2 Max, you ship the whole unit.
Key Specs:
- Capacity: 2048Wh
- AC output: 2400W (5000W surge)
- Solar input: up to 1000W MPPT
- LiFePO4 cells rated to 3000+ cycles
- Weight: 50 lbs
Pros:
- Zero wiring knowledge required — panels in, done
- 2048Wh covers most van lifers’ 2-3 day buffer in one unit
- Expandable with EcoFlow’s extra battery module (adds another 2048Wh)
Cons:
- 50 lbs and bulky — takes up meaningful floor or cabinet space in a small van
- If the inverter or BMS fails out of warranty, there’s no field repair; it’s a warranty claim or a $1,000 paperweight
- AC output efficiency is lower than a dedicated hardwired inverter — running 12V loads directly from a hardwired battery bank wastes less energy
Field note: Used this as my sole power source for a five-day trip in a rented Promaster City. Two 200W Renogy panels on a magnetic mount, Delta 2 Max inside, no wiring. Ran a 12V fridge, charged my laptop twice daily, and still had 30% left on day five. For a rental or trial run, nothing beats the simplicity.
Best for: Weekend warriors, part-time van lifers, or anyone testing a system before committing to a hardwired build.
[INTERNAL LINK: best portable power stations for van life]
Comparison Table: Van Solar System Components at a Glance
[IMAGE: solar system components comparison]
| Product | Type | Price (approx.) | Key Spec | Best For |
|---|---|---|---|---|
| Renogy 200W Starter Kit | Solar panels + PWM controller | ~$229–$259 | 200W total, 30A PWM | First-time builders |
| Victron SmartSolar 100/30 | MPPT charge controller | ~$109–$129 | 400W max PV, Bluetooth | LiFePO4 builds, data nerds |
| Battle Born LiFePO4 100Ah | Lithium battery | ~$949 | 100Ah, 3,000–5,000 cycles | Full-time van lifers |
| Victron SmartShunt 500A | Battery monitor | ~$79–$89 | 500A, Bluetooth SoC tracking | Anyone wanting real data |
| EcoFlow Delta 2 Max | All-in-one power station | ~$999 | 2048Wh, 1000W solar input | Part-time/rental builds |
How to Choose the Right Solar Setup for Your Van
[IMAGE: van life electrical wiring build]
The single biggest mistake I see is people sizing solar panels first. Start with your battery bank. If you’re full-time, you need at minimum 200Ah of LiFePO4 (two Battle Born 100Ah batteries) if you’re running a compressor fridge. If you’re weekend camping with a cooler and phone charging, 100Ah might be enough. Get that number right before you think about panels.
Once you know your battery size, size your panels to fill that bank in one good sun day. A 200Ah LiFePO4 bank holds roughly 2560Wh. At four peak sun hours and 70% real-world efficiency, you need about 450–500W of panels to fully recover from a full discharge in a day. That’s what actual math looks like — not a blog headline about “100W being enough.” It depends entirely on your load, your location, and how many cloudy days you’ll hit in a row.
For the controller, match it to your battery chemistry. LiFePO4 + Victron MPPT is the combination worth paying for. If you’re still running AGM, the Renogy PWM controller is fine for now, but budget for the upgrade when you make the lithium switch. And no matter what you pick, wire in a SmartShunt or equivalent monitor. You can’t manage what you can’t measure, and a $85 monitor will teach you more about solar system sizing in one week than any YouTube video will.
Frequently Asked Questions
[IMAGE: van life solar FAQ questions]
How many solar panels do I need for a camper van?
Most full-time van lifers run between 200W and 600W of panels. The right number depends on your daily watt-hour consumption and your typical location’s peak sun hours. A van with a compressor fridge, lighting, and laptop charging typically needs 300–400W to stay self-sufficient in summer. In winter or overcast climates, more is always better. Use a solar calculator like the one at Explorist.life to run your specific numbers before buying anything.
What size battery bank do I need for a van?
Plan for 2–3 days of consumption in your battery bank so you can handle cloudy stretches without shore power. If you use 300Wh per day, you want 600–900Wh of usable storage. With LiFePO4, that’s 50–75Ah at 12V. With AGM, double it due to the 50% depth-of-discharge limit. For most full-timers running a fridge, 200Ah of LiFePO4 is the practical minimum to feel comfortable.
Is 100W of solar enough for van life?
Rarely, for full-time use. 100W produces roughly 300–400Wh on a good day — barely enough to run a small compressor fridge for 24 hours, with nothing left for other loads. 100W works as a trickle charge for weekend trips where you’re not relying on solar as your primary source. For anyone living in their van full-time, 200–400W is the realistic entry point for genuine energy independence.
PWM vs. MPPT charge controller — which should I buy?
Buy MPPT unless you’re on an extremely tight budget with AGM batteries. PWM controllers waste 10–25% of your available solar input, which matters most in low-light conditions when every watt counts. If you’re running LiFePO4 batteries, PWM isn’t just inefficient — it can’t properly charge lithium chemistry. The Victron SmartSolar 100/30 at ~$120 is the controller I’d buy for any build where lithium batteries are in the picture.
Can I add solar to a van without any electrical experience?
Yes, but with caveats. An all-in-one unit like the EcoFlow Delta 2 Max requires zero wiring — just connect panels and go. A hardwired system with individual components requires careful attention to wire gauge, fusing, and polarity. Mistakes in 12V systems rarely cause fires if properly fused, but improper fusing absolutely can. If you’re doing your first hardwired build, follow a proven diagram from a reputable source and have a knowledgeable person check your work before powering up.
Conclusion: What to Actually Buy
[IMAGE: completed van life solar build interior]
Learning how to size a solar system for a camper van comes down to three numbers: your daily watt-hour load, your battery bank capacity, and your panel wattage. Get those right and the rest is component selection. My personal starting point for any full-time hardwired build: Renogy 400W panels, Victron SmartSolar 100/30 MPPT controller, two Battle Born 100Ah batteries, and a SmartShunt. That’s around $2,400 in components and it will run reliably for years without drama. If you’re not ready to commit to a hardwired build yet, start with the EcoFlow Delta 2 Max and two 200W panels. Live with it for a season. You’ll know exactly what you need to upgrade when the time comes.